
NOTE!!! Supported Countries: United States, Canada, United Kingdom, Australia, and New Zealand. You must activate Afterpay for use on your ShortcutsPay terminal.
Afterpay is activated in one of two ways depending on if you already have an existing Afterpay merchant account, or you are signing up to Afterpay for the first time.
How to activate Afterpay for your ShortcutsPay terminals
1. If you have an existing Afterpay merchant account:
Complete the following Afterpay request form: Afterpay Request Form
When completing the form, use the following information (steps to gather Stripe information can be found at the bottom of this article):
| What brand is your request for? | Afterpay/Clearpay - In-Store |
| Merchant ID (MID)? | Enter your Afterpay Merchant ID |
| What in-store category best describes your request? | Other |
| What 'other' category best describes your request? | FAQ |
| Please explain your request in detail:* |
I want to activate Afterpay on my new Stripe terminal/s. Below are my details for you to process this request: Scheme Name: [Your Stripe Statement Descriptor] Acquirer MID: [Your Stripe Account ID] |
2. If you are signing up to use Afterpay for the first time (new merchant account)
If you do not already have an Afterpay merchant account you must first register for one. Sign up here: Signup to Afterpay
After signing up to an Afterpay Merchant account, look for an automated email from Afterpay with the subject line “Afterpay Card is ready for you to set up”. This email contains instructions for completing a test transaction. Check your junk mail folder if you can't find this email.
You can finalise activation through one of two methods:
Option 1: Test Transaction Method
Follow the test transaction instructions provided in the Afterpay onboarding email. This provides Afterpay with the information required to activate Afterpay on your ShortcutsPay (Stripe) terminals.
Option 2: Manual Information Submission
If you operate multiple business locations, you must gather the required information for each location and reply directly to the automated email titled "Afterpay Card is ready for you to set up" (steps to gather Stripe information can be found at the bottom of this article)
| Store Name | The registered public name of your merchant location |
| Address | The full physical address of your business |
| Afterpay Merchant ID | The account identifier issued directly to you by Afterpay |
| Scheme Name | [Your Stripe Statement Descriptor] |
| Acquirer MID | [Your Stripe Account ID] |
Afterpay will process the information provided in your reply and provision your Stripe Terminal hardware to accept Afterpay Card mobile wallet payments.
How to find the Stripe information required when activating Afterpay.
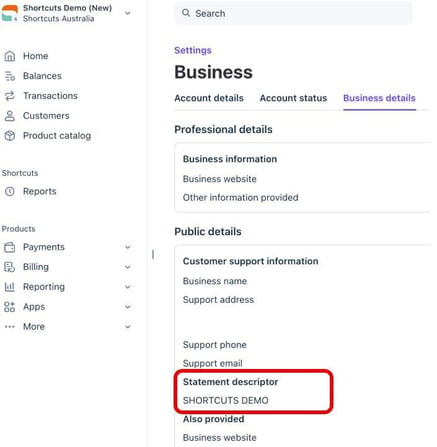
How to find your Scheme Name: This is called the Satement Descriptor in your Stripe account.
- Log in to Stripe.
- Go to Settings (cog icon top right)
- Select Business
- Select Business Details.
- Your Stripe Statement Descriptor (Scheme Name) is located in the section called Public details.
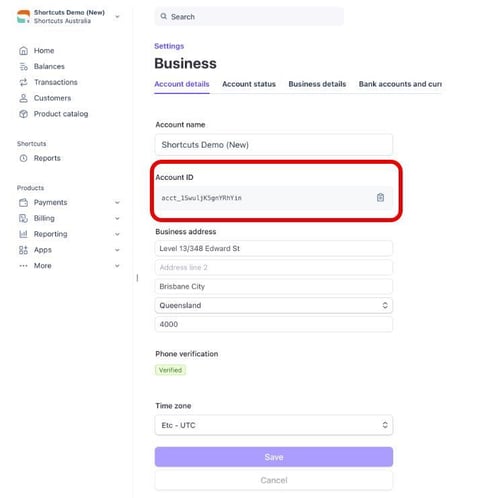
How to find the Acquirer MID: This is called your Account ID in Stripe.
- Log in to Stripe.
- Go to Settings (cog icon top right)
- Select Business
- Select Account Details
- Copy Account ID.
NOTE!!! QR code- based payment methods are not available for Afterpay/Clearpay on Terminal.
Page URL: https://help.shortcutssoftware.com/en/shortcutspay-setting-up-afterpay-on-terminal