Accessing Self Check-In and Wallboard Settings
-
Log In: Access your Smart System Console. https://console.shortcutssoftware.com/onlinequeue/settings
-
Navigate to Self Check-in Settings: Click on the arrow on the right side to "Page 2" to view more options, then select Self Check-In Settings.
-
Select Site (if applicable): Choose the site you want to configure settings for if you have multiple locations.
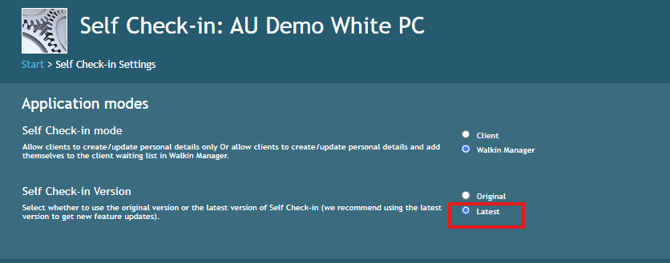
- Select either:
-
-
Walk-In Manager - For direct self-check-ins.
-
Client - For customers updating information via tablets or computers.
- Self Check -in Version must be the Latest.
(Original will be deprecated and only the newer version can be used.)
-
Key Configuration Options
"Latest" Settings
- Customise the look & feel by specifying background images
- Adjust the search setting
- Allow guests to opt in to marketing when registering
- Team members can be shown and chosen by guests up to 30 minutes ahead of their starting time, so that guests who prefer those employees can choose to wait for them when they check in (relies on using Roster/Schedule)
- Display disclaimers to guests as they check in (eg“Extra prices may apply for long hair”)
- Guests can no longer check in twice and cause inaccurate wait times for the following guests
Customer Information Settings
-
Mandatory Fields - Specify required fields (e.g., first name, last name, email) for check-in.
-
Search Options - Enable search by first name, last name, or email.
-
Editable Information - Allow customers to update details like phone number and email.
-
Demographics - Collect optional data such as physical address or other demographics.
Appointment and Employee Preferences
-
Employee Requests - Enable customers to request specific employees.
-
Service Pricing - Display pricing during check-in.
-
Wait Times - Show estimated wait times based on:
-
General queue.
-
Specific employees.
-
Visit Delay and Queue Management
-
Delayed Visits - Allow customers to hold their place in line but return later.
-
Delay Limits - Set maximum delay time (e.g., 30 minutes).
-
SMS Notifications - Notify customers about their turn with customizable timing.
Security Measures
-
Captcha Verification - Prevent bots by requiring CAPTCHA verification.
-
On-Screen Keyboard - Enable for tablet use.
Idle and Reset Timers
-
Idle Timeout - Set time limits (e.g., 10 seconds) for inactivity before resetting.
-
Reset Timer - Return to the main screen after an appointment is made.
Roster and Availability Settings
-
Configure based on:
-
Rostered Availability - Scheduled employee hours.
-
Current Availability - Actual clocked-in employees.
-
Wall Board Display Options
-
Queue Visibility - Show:
-
Wait times for individual customers.
-
Positions in the queue.
-
-
Display Settings - Customize how many customers are visible based on screen size.
-
Fallback URL - Set an alternate webpage for interruptions.
Branding and Graphics Customisation
-
Background Images - Upload custom graphics for:
-
Desktop screens (1920 x 1080 pixels).
-
Mobile devices in portrait mode.

-
-
Different Screens - Use unique images for initial and subsequent screens.
*the text is default colour is Dark Grey and Dark Blue/Grey navigation buttons this can not be changed. Please keep this in mind when changing background for the navigation.

Finalising Changes
-
Review all settings.
- Press Save to apply changes.
Add Self Check-in to Website with URL
- Open Self check- in on browser.
- Copy URL with GUID number
example: https://shortcuts-cstestmachine.mylocalsalon.com/onlinequeue/SelfCheckIn/Home?siteGuid=b276d60b3398de01a9ee0050563fff03
This can be added to website, QR Code or Social pages.
Add Self Check-in via website Plug- in Code
- Click on Self check-in settings
- Click on My Website Plug-in Code

Pro Tips:
-
Regularly test settings to ensure optimal performance.
-
Update branding elements seasonally for a fresh look.
-
Monitor customer feedback to refine configurations.