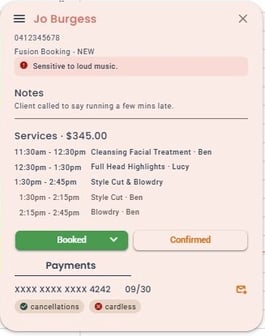
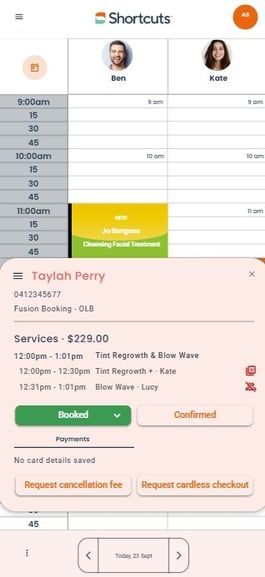
The appointment touch tip provides a quick and easy way to manage appointments and client details.
Access Appointment Details: When you select an appointment, the touch tip opens, showing an overview of the appointment.
Notes/ Alerts can be viewed from this screen edit via client profile.

Understanding services warnings
When you click/hover over on the warning you will see the matching description.

How to edit clients profile
- View Customer Information: Clicking on the client’s name allows you to view and edit their details.


Understanding Appointment Status

- Update Appointment Status: You can update the appointment status directly from the touch tip by clicking the buttons near the bottom of the touch tip.
- Predicted Status: The touch tip displays the current and next predicted status for the selected appointment. For example Booked and Confirmed
- Arrived button is disabled until day of appointment
Q: On the day of the appointment - if the appointment hasn’t been changed to Arrived - can I still checkout the client?
- when the appointment is longer than 15 mins in duration:
- The Checkout button will automatically appear 15 mins after the appointment start time if it is not already visible on the touch tip.
- when the appointment is less than 15 min in duration:
- The Checkout button will automatically appear at the end of the appointment start time if it is not already visible on the touch tip.
Default view on day of appt: In ‘Arrived state’

View on day of appt: 15 mins after appt time: Not in Arrived state

Touch Tip Menu
- More actions menu is located on the top left corner
These include: SMS ,Rescheduling/Rebooking/change to booking, Customer History , and Appointment logs.

How to View Customer History
- Select the appointment, click on the menu icon and from the drop down choose Customer History to view past interactions and details.
- When finished, click the Appointments icon to return to the appointment book.
How to View Clients forms

Form are located on the bottom right of the touch tip. If the Client has forms to complete you will see at a glance how many in red.
Once you click on the forms
- Form/s that have been sent to the client will be listed.
- Green tick shows form complete
- Maroon circle with dots shows form not complete
- To view the form that has been completed click on the name of the form
- If the client has not completed a form you can now click on the form and hand to client to complete.
Cardless Check out and Cancellations
Easily Request Cancellations and Cardless check out, icons will display at the bottom of the screen if enabled.
If the card has been captured it will be displayed, and the Green tick or Red Cross indicating if the Client has opted in or not.